Introduction: The Importance of Clear and Sharp Photography
You might LOVE taking photos, but when you look back at your photos, you might find they are not as clear and sharp as you want them to be. “What happened,” you might think to yourself! This is frustrating but can be fixed.
Join me, Professora Pet Photographer from Melanie Witt Photography, as I teach you a few strategies to reduce blur and increase sharpness in your photos…
Tip 1: Choose the Right Camera Settings for Sharpness
Pay attention to your aperture:
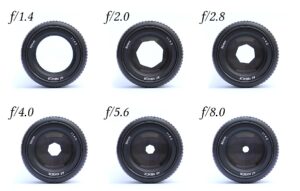
- Your aperture is the opening in your lens that lets light through. You can open up wide to let less light in and close it down to allow more light in. A large aperture (or wide opening like f/1.8) will let a lot of light in. A small aperture (or small opening like f/22) lets less light in. For example, if you are in a dark room or it is night time, opening your aperture up wide to like f/1.8 allows more light to pass through the lens. Conversely, if it is a bright sunny day, a small aperture like f/16 can help you avoid blowing out your image (introducing too much light and washing out your photos).
- Why is this important in reducing blur and increasing sharpness in your images? A wider aperture (lower f-number) will help you create a shallow depth of field and ensure your subject stands out while the background remains blurry. This is one way to eliminate distractions and add clarity to your photos.
- If you’re photographing a landscape, though, you will likely want most, if not all, of the subject in focus. In this case, you should not be blurring the background like you would in a photo of a dog outside.
- For example, I usually like to create creamy blurred bokeh in my portraits, so I open up as wide as my lens will go (often that is f/1.8 or f/2.8), but many times I shoot landscapes at around f/8 because I want to see most of the frame in focus.
- But, you it is best to shoot at the “sweet spot” on your lens. Did you know all lenses have sweet spots – that is an aperture or range of apertures that will offer sharper images. You can set your camera on a tripod and play around with the various apertures to find the “sweet spot.” Most of the time, you find that the “sweet spot” is about 2 stops from the widest aperture. You can also get a baseline on Google and adjust based on what you see in your images. For example, I find the “sweet spot” on my Canon 85mm f/1.8 to be f/2.8. Finding your “sweet spot” will help to get sharp images.
Increase shutter speed
- A faster shutter speed helps freeze motion and reduce the chances of blur caused by camera shake or a moving subject. When you are photographing moving subjects like dogs, you need to adjust your settings accordingly.
- When I was a kid just learning to shoot photos, I was told not to go lower than 1/60 of second when I was handholding my camera. I think this is a good base to start with. The most common reason photos are blurry is because we are not holding our cameras still when our shutter speeds are low.
- When I worked in sports photojournalism and shooting events and concerts, I learned that you should set your shutter speed to at least the length of your lens’s focal length. So, for example, if you are using a 200mm lens, you should set your shutter speed to at least 1/400 of a second or faster. But, today many lenses have image stabilization, and that can offset the need to increase your shutter speed.
- Another option is to increase your ISO because noise can be fixed in post production today. Back when I was photographing sports and concerts in dark venues, we would shoot at higher ISOs because we needed to capture action without the blur and it was more acceptable for film to have that “noisy” look to it.
Select an appropriate ISO
- Many photographers will tell you to use the lowest possible ISO setting to minimize digital noise in your images. I generally agree with this; however, if you are photographing a wedding with very little light at night, you might sacrifice noise for composition and capturing emotion. I guess this comes from my days shooting in photojournalism and promotions photography. Plus, today, it IS 2023, and post production software is amazing at reducing noise, even at super high ISOs. I recommend experimenting with different ISO levels based on lighting conditions and purpose. If you are shooting in a studio, I would highly encourage you to always shoot at ISO 100.
pet photography tips, clear pet images, camera settings for sharpness, aperture control, freezing motion in photos, optimal ISO settings
Tip 2: Mastering Focus Techniques for Crisp Pet Portraits
Select single-point autofocus:
- Choose a single autofocus point to have precise control over what you want to be in focus. Place it strategically on your subject’s eyes or face for captivating portraits.
Servo mode for moving subjects
- When photographing active pets, switch to continuous autofocus (AI Servo) mode, so your camera tracks their movements and maintains focus as they move.
Utilize back-button focusing
- Assign autofocus activation to a dedicated button on the back of your camera. This allows you to separate the focus and shutter release functions, giving you more control over timing and avoiding accidental refocusing.
pet portrait photography, focus techniques, single-point autofocus, continuous autofocus, back-button focusing
Tip 3: Proper Handling and Stabilization for Blur-Free Shots
Hold your camera steady
- Practice keeping your elbows as close to your body as you can and using both hands to stabilize the camera. Consider using a tripod or monopod for added stability if the situation allows for it. Dogs move too much, so I do not use tripods or monopods. When I was shooting football and surfing, I had to use a monopod because the lenses were so long and heavy (I was a 20 something young gal with not a lot of upper body strength). The longest lens I use today is a 200 mm, and that is something I can handhold without a monopod, but it is heavy and does take practice.
Breathe and shoot
- Try to take a deep breath before pressing the shutter button to minimize any shaking caused by breathing. Exhale slowly as you capture the shot. This is not always possible when you are shooting moving subjects like pets. When I was a kid, I used to shoot archery with my dad; it is a similar process when pulling your bow back and releasing the arrow.
Avoid harsh lighting conditions if you are not using a flash or if you do not want a specific look
- Harsh sunlight can create unwanted shadows or highlights that distract from the overall clarity of your pet photos. Shoot during softer lighting conditions (think overcast days) or use diffusers or reflectors to control light intensity. This really is fluid depending on what your photographic style is, though. This is a good tip as you are beginning to try to get those crisp photos. When you are better at manipulating other parts of the process, then you can add in harsh lighting. I actually LOVE how harsh lighting can create moody photos.
pets photography stability, handheld photography tips, breathing techniques for steady shots, lighting for pet photography
Conclusion: Capture Timeless Memories with Clear Pet Photos
When you start to incorporate these expert tips into your photography sessions in Denver or wherever you are, you will notice that you are starting to capture stunningly clear images that truly showcase the beauty of pets or your subject matter. Implementing these techniques will not only reduce blur but also elevate your skills as a professional photographer. But, I hope the biggest takeaway here is to practice and learn what works and what isn’t. For me, learning is a BIG part of the process. Cheers to learning! For more tips check back on Melanie Witt Photography and follow me @melaniewittphotography